
Recently, I went through the process of setting up a new development environment on Windows for my playground projects at home. My work is usually done and hosted on Linux with a standard LAMP stack, so using an ubuntu virtual machine lets me keep my Windows machine for gaming and allows me to develop in a comfortable environment. You can follow along with the steps below, or give me tips on what could be done better :)
Warning, it is quite long! But it does cover installing the tools, setting up a LAMP stack, creating a virtual host and installing WordPress.
Step 1: Install the tools
Download and install VMWare Player: VMWare Player Download Page for running your virtual machine. It's probably worth noting that we're only going to get a terminal interface, not a GUI for the VM (I find this suits my needs perfectly).Now for our virtual machine, if you want to run Ubuntu like me, then you can download an Ubuntu image from here: Ubuntu Server Images for VMWare. I used "32-bit: ubuntu-server-12.04-i386.zip" even though my computer is 64bit. I just didn't see any reason that my web server needed to be a 64 bit machine, but this should probably match whatever you use for hosting.
Next, unzip the Ubuntu image and put it somewhere safe & easily accessible on your hard drive. This will end up containing all your work, so really do make sure it's safe!
Now for the fun part, run VMWare player. Choose "Open a Virtual Machine" and navigate to where you saved your Ubuntu image & choose to open it.
You'll now have the options to "Play virtual machine" or "Edit virtual machine settings". You can give your new VM a better name by choosing edit, and then going to the options tab.
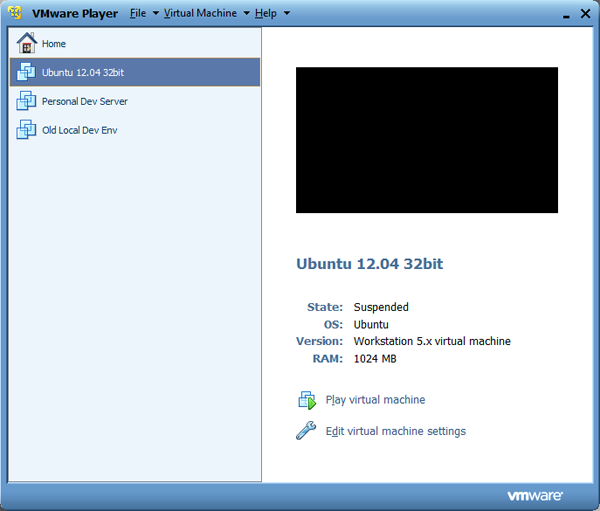
Hit "Play virtual machine". Important: you will be prompted to choose between "I moved it" and "I copied it", always choose "I moved it" which is NOT the default option. Failure to do this will cause you problems later. You will be prompted to log in, if you downloaded the suggested Ubuntu image then use the provided username and password from the thought police site, probably something like notroot & thoughtpolice.
Run the following commands to get any updates. It will take a few minutes, but then you will have Ubuntu installed, up-to-date and ready to start playing with.
sudo apt-get update
sudo apt-get upgrade
Note: throughout this tutorial, whenever you are prompted with a [Y/n] always type Y.
Note: if you've not used VMWare player before - to focus the VM you click on it as you would expect, but to get out of it and get your mouse cursor back you need to press CTRL + ALT.
Step 2: Install apache
Next, lets turn our Ubuntu install into a working web server, by installing Apache HTTP Server:
sudo apt-get install apache2
We need to edit the config:
sudo vim /etc/apache2/httpd.conf
Add the following line to the file, which will be blank. This defines our web server as being called localhost which is the norm for local development environments.
ServerName localhost
Note: If you've not used vim on the command line to edit a file like this before, you'll need to press i to enter insert mode and start adding new content to the file. When you're done editing press esc to leave insert mode, and then type : followed by w and then q. The : brings up a command line and the wq means "write and quit". Press enter and the file will be saved and closed.
Finally, we need to restart the server for our changes to take effect.
sudo /etc/init.d/apache2 restart
We now have a working local web server, therefore we have files on the Ubuntu VM which are addressable via IP addresses / URLs such that they can be opened and run in a browser. Apache has created these web accessable files a new folder that will be located at /var/www. Let's verify that this is true.
Type the following into your VM:
ifconfig
You should see something similar to the image below, you are looking for the inet address assigned to eth0, which will be the IP address you can use to access your webserver.
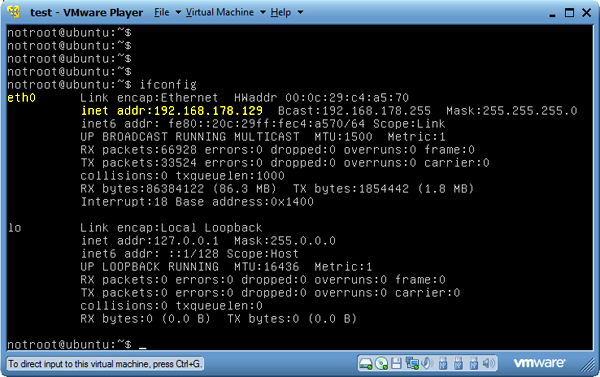
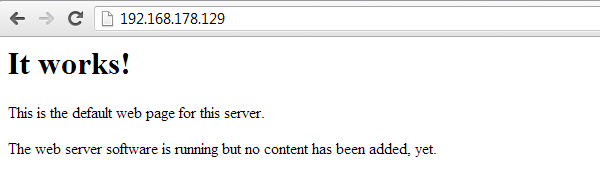
Open up your favourite browser, and enter http://#IP address here#, for the example above it would be http://192.168.178.129. You should see the "It works!" default file from apache much like the one shown below:
You can verify that this is indeed fetching files from your virtual machine by making a change. Navigate to your www folder:
cd /var/www/
Change the owner of the default index file and then open it for editing:
sudo chown www-data.www-data index.html
sudo vim index.html
Make any change you like for testing.
Don't forget: i for insert mode, type esc + :wq to save and quit
Once you've edited and saved the file, refresh the page in the browser to see your changes take effect.
Editing the Windows hosts file
In XP and before, this was merely a case of opening the file, but from Vista onward it's a little trickier as you have to be administrator.
- Browse to `C:/Windows/System32` or do a search for `notepad.exe`
- Right click on `notepad.exe` and choose `"Run as administrator"`
- Go to `File > Open`
- Navigate to `C:/Windows/System32/drivers/etc`
- Change file types `to All Files (*.*)`
- Open `hosts`
Localhost
It may be the case that you would prefer to refer to your web server by http://localhost, instead of having to remember the IP address. If this is the case then you need to edit your Windows hosts file to tell Windows about the name you want to use for your IP address. See the block to the right for details of how to open up your Windows hosts file.
Once you've got it open, you need to add a line to it to map the IP address to localhost or whatever name you might like to use:
#IP address here# localhost
So for my example I would put
192.168.178.129 localhost
Once you've edited the file you will need to save it. It may take a few seconds to update, but you will then be able to enter http://localhost into your browser and get to the default page. If it doesn't seem to be updating, you may need to flush the DNS cache. This is done in Windows by running ipconfig /flushdns either via the "Search programs & files" box in the start menu, or in a command prompt.
Step 3: Installing PHP & MySQL
We've got our LA part of LAMP, now it's time for the M & P! This bit is super easy.
To install PHP type the following in Ubuntu:
sudo apt-get install php5 libapache2-mod-php5
sudo /etc/init.d/apache2 restart
Let's check it works, by adding a PHP file:
cd /var/www/
sudo vim test.php
Add the following code to the file and save it:
<?php
echo "Hello World";
You can access this file to test it via either http://192.168.178.129/test.php or if you set it up: http://localhost/test.php.

To get MySQL installed:
sudo apt-get install mysql-server
You will be prompted to set and confirm the password for your MySQL admin user.
sudo apt-get install php5-mysql
You can test that MySQL is installed correctly by playing around with the MySQL admin (you'll be prompted for the password you just setup):
mysql -u root -p
Exit mysql by typing "quit".
Step 4: install and setup samba
Samba is what makes using a Linux VM as a development environment really simple. It's a little fiddly to setup, but once it is done you will be able to edit the files in your /var/www/ folder directly through Windows, using any IDE you choose. Let's get started...
sudo apt-get install samba samba-common
Add your user to samba (if you used the image suggested, this will be "notroot"):
sudo smbpasswd -a #your user#
Enter your password for your user, then we need to backup and edit our config for Samba so it's safe to edit:
cd /etc/samba
sudo cp smb.conf smb.conf.bak
Open the file for editing
sudo vim smb.conf
You need to make the following changes (use the arrow keys to scroll):
In the "Authentication section, uncomment (remove the hash / semi-colon) from the line
security = user
Then at the very bottom of the file, add the following and save the file:
[www]
comment = Web Root Dir
path = /var/www/
browsable = yes
read only = no
writable = yes
valid users = notroot, www-data
write list = notroot, www-data
read list = notroot, www-data
force user = www-data
force group = www-data
public = no
writable = yes
printable = no
Note that the user list should be your user (notroot if you are using the recommended Ubuntu image) and www-data.
Finally, restart samba:
sudo /etc/init.d/smbd restart
Now we should be able to connect via Windows. Open up a Windows Explorer Instance and navigate to Computer. At the top you should see a button which reads Map network drive. Select this and in the dialog that appears, choose a letter to map to, and then enter either localhost or the ip address of your web server as you found it earlier in the following format:
\\localhost\www\ or \\#IP address#\www\
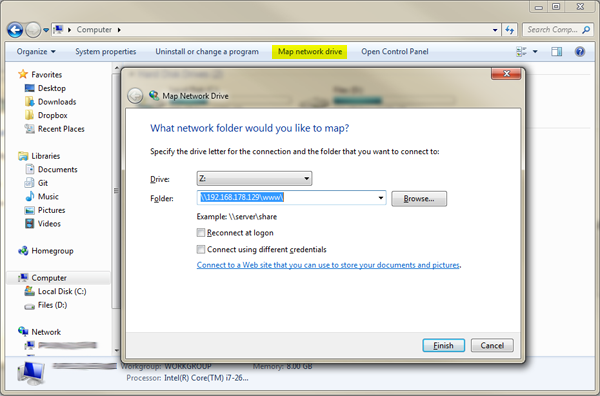
Press "Finish", you'll be prompted for your username and password again, enter it and you should see the files index.html and test.php that are in your /var/www/ folder.
If you would like to be able to login via PuTTY for a slightly nicer terminal, run the following.
sudo apt-get install openssh-server
Now in PuTTY you should be able to connect to your web server's IP address and login with your username and password.
Step 5: Installing WordPress on a virtual host
Now that we have our LAMP stack all setup, and we have access to edit our files, we're going to use it to do something interesting.
First we need to set up a folder structure which the WordPress files will live in, which should look like /var/www/wordpress/public_html. You can either create these on the command line:
cd /var/www/
sudo mkdir wordpress
cd wordpress
sudo mkdir public_html
cd ../
sudo chown -R www-data.www-data ./
Or now that Samba is setup and working, just create the folders in Windows.
With the folders created, setup a virtual host by creating a new vhost file:
sudo vim /etc/apache2/sites-available/wordpress
Add the following to the file:
<virtualhost *:80>
  ServerName wordpress.dev
  DocumentRoot /var/www/wordpress/public_html
  DirectoryIndex index.php
</virtualhost>
Save the file. We need to enable our new vhost and then restart apache:
sudo a2ensite wordpress
sudo /etc/init.d/apache2 restart
So that we can access it in the browser, we need to add the new ServerName as a host to the Windows hosts file (see the localhost section above).
If you added localhost to it earlier, then change the line to look like:
#IP address# localhost wordpress.dev
Otherwise just add the line:
#IP address# wordpress.dev
Go to http://wordpress.dev in your favourite browser, and you should get an "It works!" page again.
Note: I like to use the fake TLD .dev to remind myself when I'm on the development version of a site, other people prefer to use a subdomain of the correct domain.
Now for WordPress. Download WordPress from wordpress.org and extract the files.
Open the folders until you get to the base of WordPress where you can see the wp-admin folder then copy all of the present files & folders into the /var/www/wordpress/public_html folder using windows explorer.
Our final piece of preparation is to create a database via the MysQL admin client. In VMWare type the following:
> mysql -u root -p
CREATE DATABASE wordpressdb;
GRANT ALL PRIVILEGES ON wordpressdb.* TO "wordpressdb"@"localhost" IDENTIFIED BY "wordpressdbuser";
Now we have everything we need, go back to http://wordpress.dev in your browser and you should see the install screen for WordPress.
Follow the on-screen install instructions providing the MySQL database details you setup above.
Finally, we're done! We've got a working web server which is running a virtual host with a WordPress install. Setting up a virtual host for any other purpose is much the same as for WordPress - you need the folders first, then a vhost file, you enable your vhost,restart apache and finally add the new name to your Windows hosts file.
Hopefully this has been useful, it only covers the basics of getting from A to B so there are many, many other configuration options to play with and packages to install depending on what you want to do. It's also not been secured, I do not recommend using these settings for configuring a production server.
Additional resources
- HTTPD - ubuntu help
- How to install LAMP and PHPMyAdmin on Ubuntu - Unixmen
- File sharing with samba - SitePoint
- How to set up apache virtual hosts on ubuntu 12 04 lts - digitalocean
- Installing WordPress using the MySQL Client - WordPress Codex